

Rob Gibbon
23 September 2026
So you want your own pet LLM huh?
Knowing where to start can be quite tricky, so luckily for you I’ve put together this end-to-end guide. It’ll get you not just started; you’ll end with a fully working chatbot that you’ve fine tuned on the dataset `nampdn-ai/tiny-webtext`, which is a training dataset designed to improve models’ critical thinking abilities. Buckle up, this is going to be both fun and deep.
We’re going to do everything using Canonical’s Charmed Kubeflow – an enterprise MLOps platform equipped for end-to-end model fine-tuning within a sovereign setup. You can deploy it on a high-performance laptop or a homelab running Kubernetes. If you’re planning to do this at scale, you can even run it in a full-on, data center-scale AI factory with many nodes, GPU accelerators, and ultra high-performance network fabric. Check out the Charmed Kubeflow product page on canonical.com or sign up for the managed service, which runs Charmed Kubeflow in your own Microsoft Azure tenancy with the backing of around the clock operational management from Canonical.
All the files you’ll need can be found in my GitHub repo, but let’s check your system specs first. For this project you will need:
- One or more computers running Ubuntu 24.04 LTS or later with 32GB RAM and 16 cores, more is better
- A good, stable internet connection to download rather large stuff
- Some familiarity with Linux and Kubernetes – at least, enough to be able to follow along and run the commands.
- An account on Hugging Face so that you can download the dataset we’ll be using.
Sounds good? Cool. Let’s bring up the system.
Open up your terminal and make sure you’ve got the base software installed. Run the following commands:
sudo snap install microk8s --channel 1.34-strict/stable
sudo microk8s enable storage dns
sudo microk8s enable metallb 10.64.140.43-10.64.140.49
sudo snap install juju --channel 3.6/stable
sudo microk8s.config | juju add-k8s my-k8s --client
juju bootstrap my-k8s
sudo snap install terraform
sudo apt install git -y
git clone https://github.com/canonical/charmed-kubeflow-solutions.git
pushd charmed-kubeflow-solutions
git checkout track/1.11-rc
pushd terraform/products/kubeflow
Ok, awesome. That got you set up with a one-node, super-compact Kubernetes cluster running Canonical’s MicroK8s, with Canonical’s operations management engine Juju, and with Terraform.
Now let’s launch Charmed Kubeflow. We’re going to enable the Kubeflow base system, Kubeflow Trainer v2, KServe model server, and Feast. We’ll disable all the other modules like Katib, MLFlow, TensorBoard, federated login and the Canonical Observability Stack. You can always enable them if you want.
DEX_USERNAME=username
DEX_PASSWORD=password
terraform init
terraform apply -auto-approve -var dex_static_username="${DEX_USERNAME}" -var dex_static_password="${DEX_PASSWORD}" -var enable_feast=true -var enable_katib=false -var enable_kserve=true -var enable_training_v2=true -var enable_training_v1=false -var enable_observability=false -var enable_tensorboard=false
popd
popd
Once the Terraform plan completes, it might still take a good 10 minutes for things to come up on the Kubernetes cluster. You can monitor how close to ready things are getting with the command `juju status`. When everything is saying “available”, you’re gold and you can try to log into Kubeflow.
Open a new tab in your browser and set the address to http://10.64.140.43. You should see a login screen. Here you can enter the username and password that you set earlier in the variables `DEX_USERNAME` and `DEX_PASSWORD`. Once you’re in, step through the setup wizard and you should see the Kubeflow Dashboard screen.
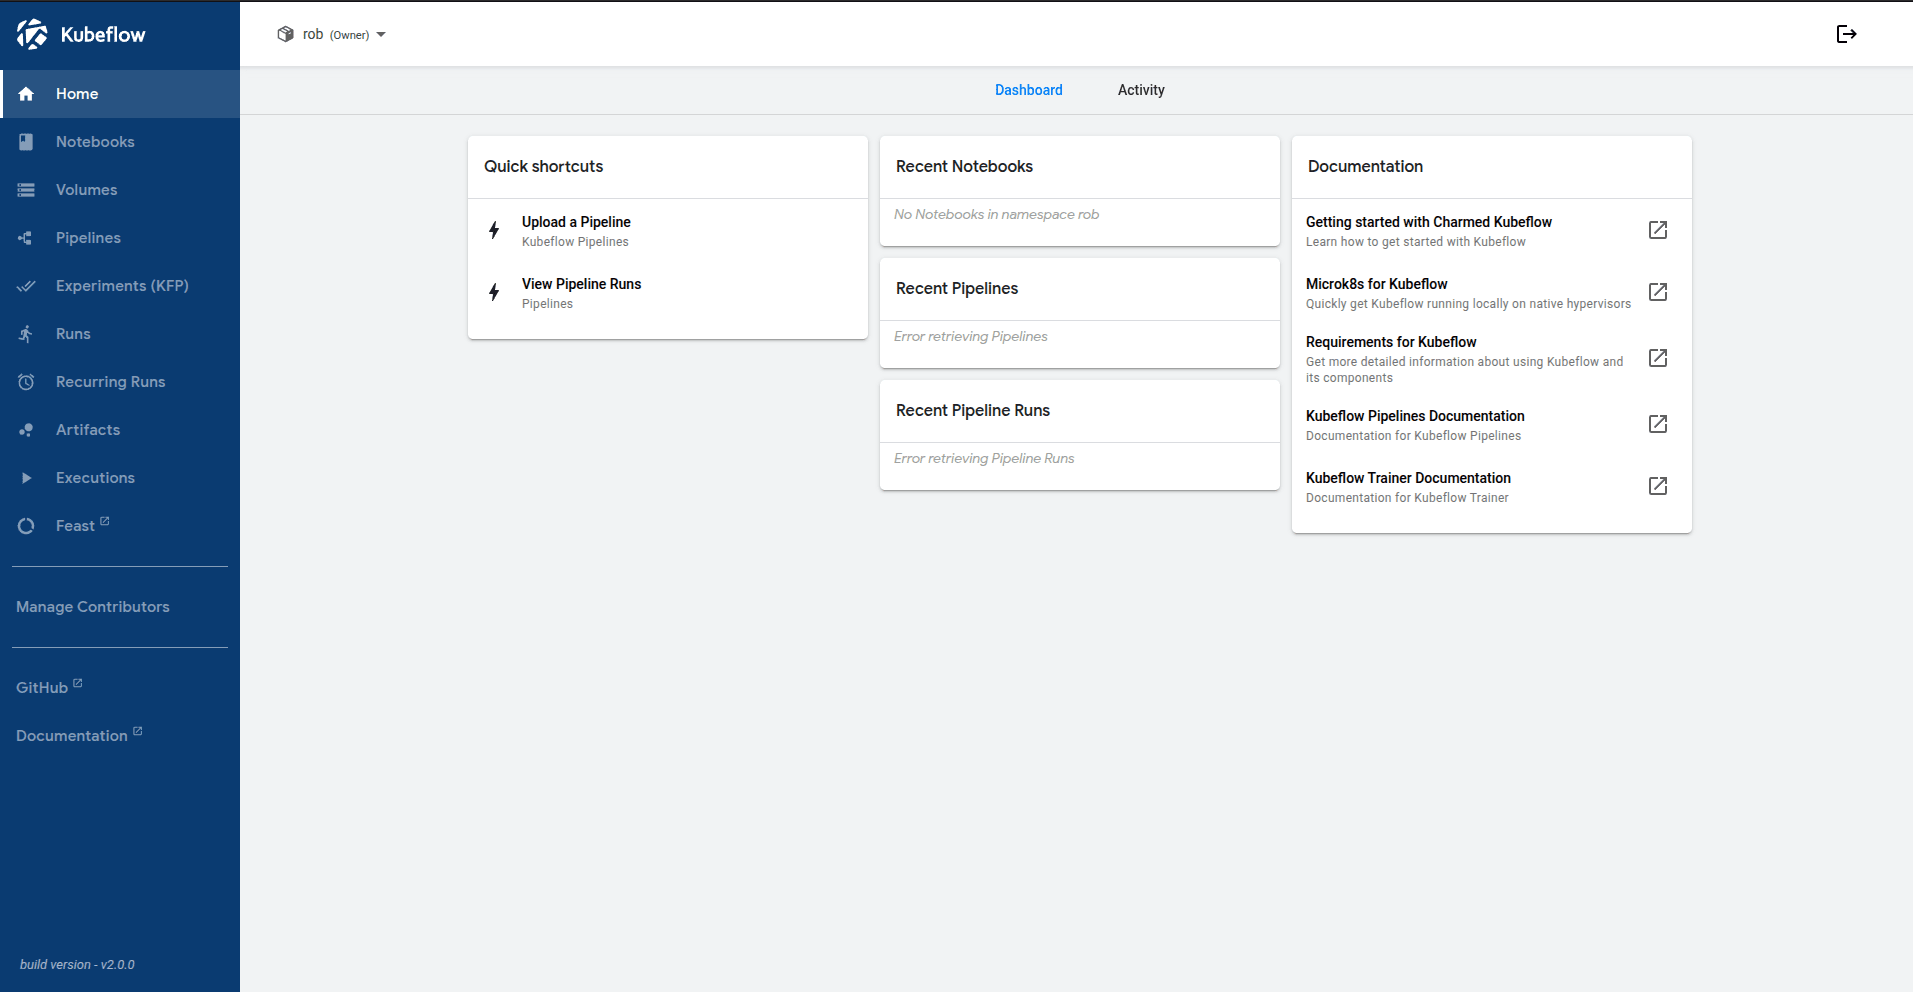
Now, go to Notebooks in the left menu, and launch a new Jupyter Notebook. Make sure you give the notebook a maximum of at least 3 CPU cores and 6GB of RAM, because it’s going to do quite a bit of work here. Also, very important, there’s an “advanced options” setting, expand that, and then in configurations, make sure to check both “allow access to Kubeflow Pipelines” and “allow access to Feast” before you click the launch button. This will inject all the necessary information into your Jupyter Notebook to be able to access these services as files or environment variables.
Once your notebook is available, you’ll see a green tick icon next to it on the list of notebooks in the dashboard and the “connect” button becomes active. Push connect and you should see a new tab open in your browser, with your notebook server in it. In the Launcher, launch a new terminal session. We’re going to run some commands.
But first, let’s get familiar with the model training architecture we’re going to use to fine-tune that LLM.
Architecture overview
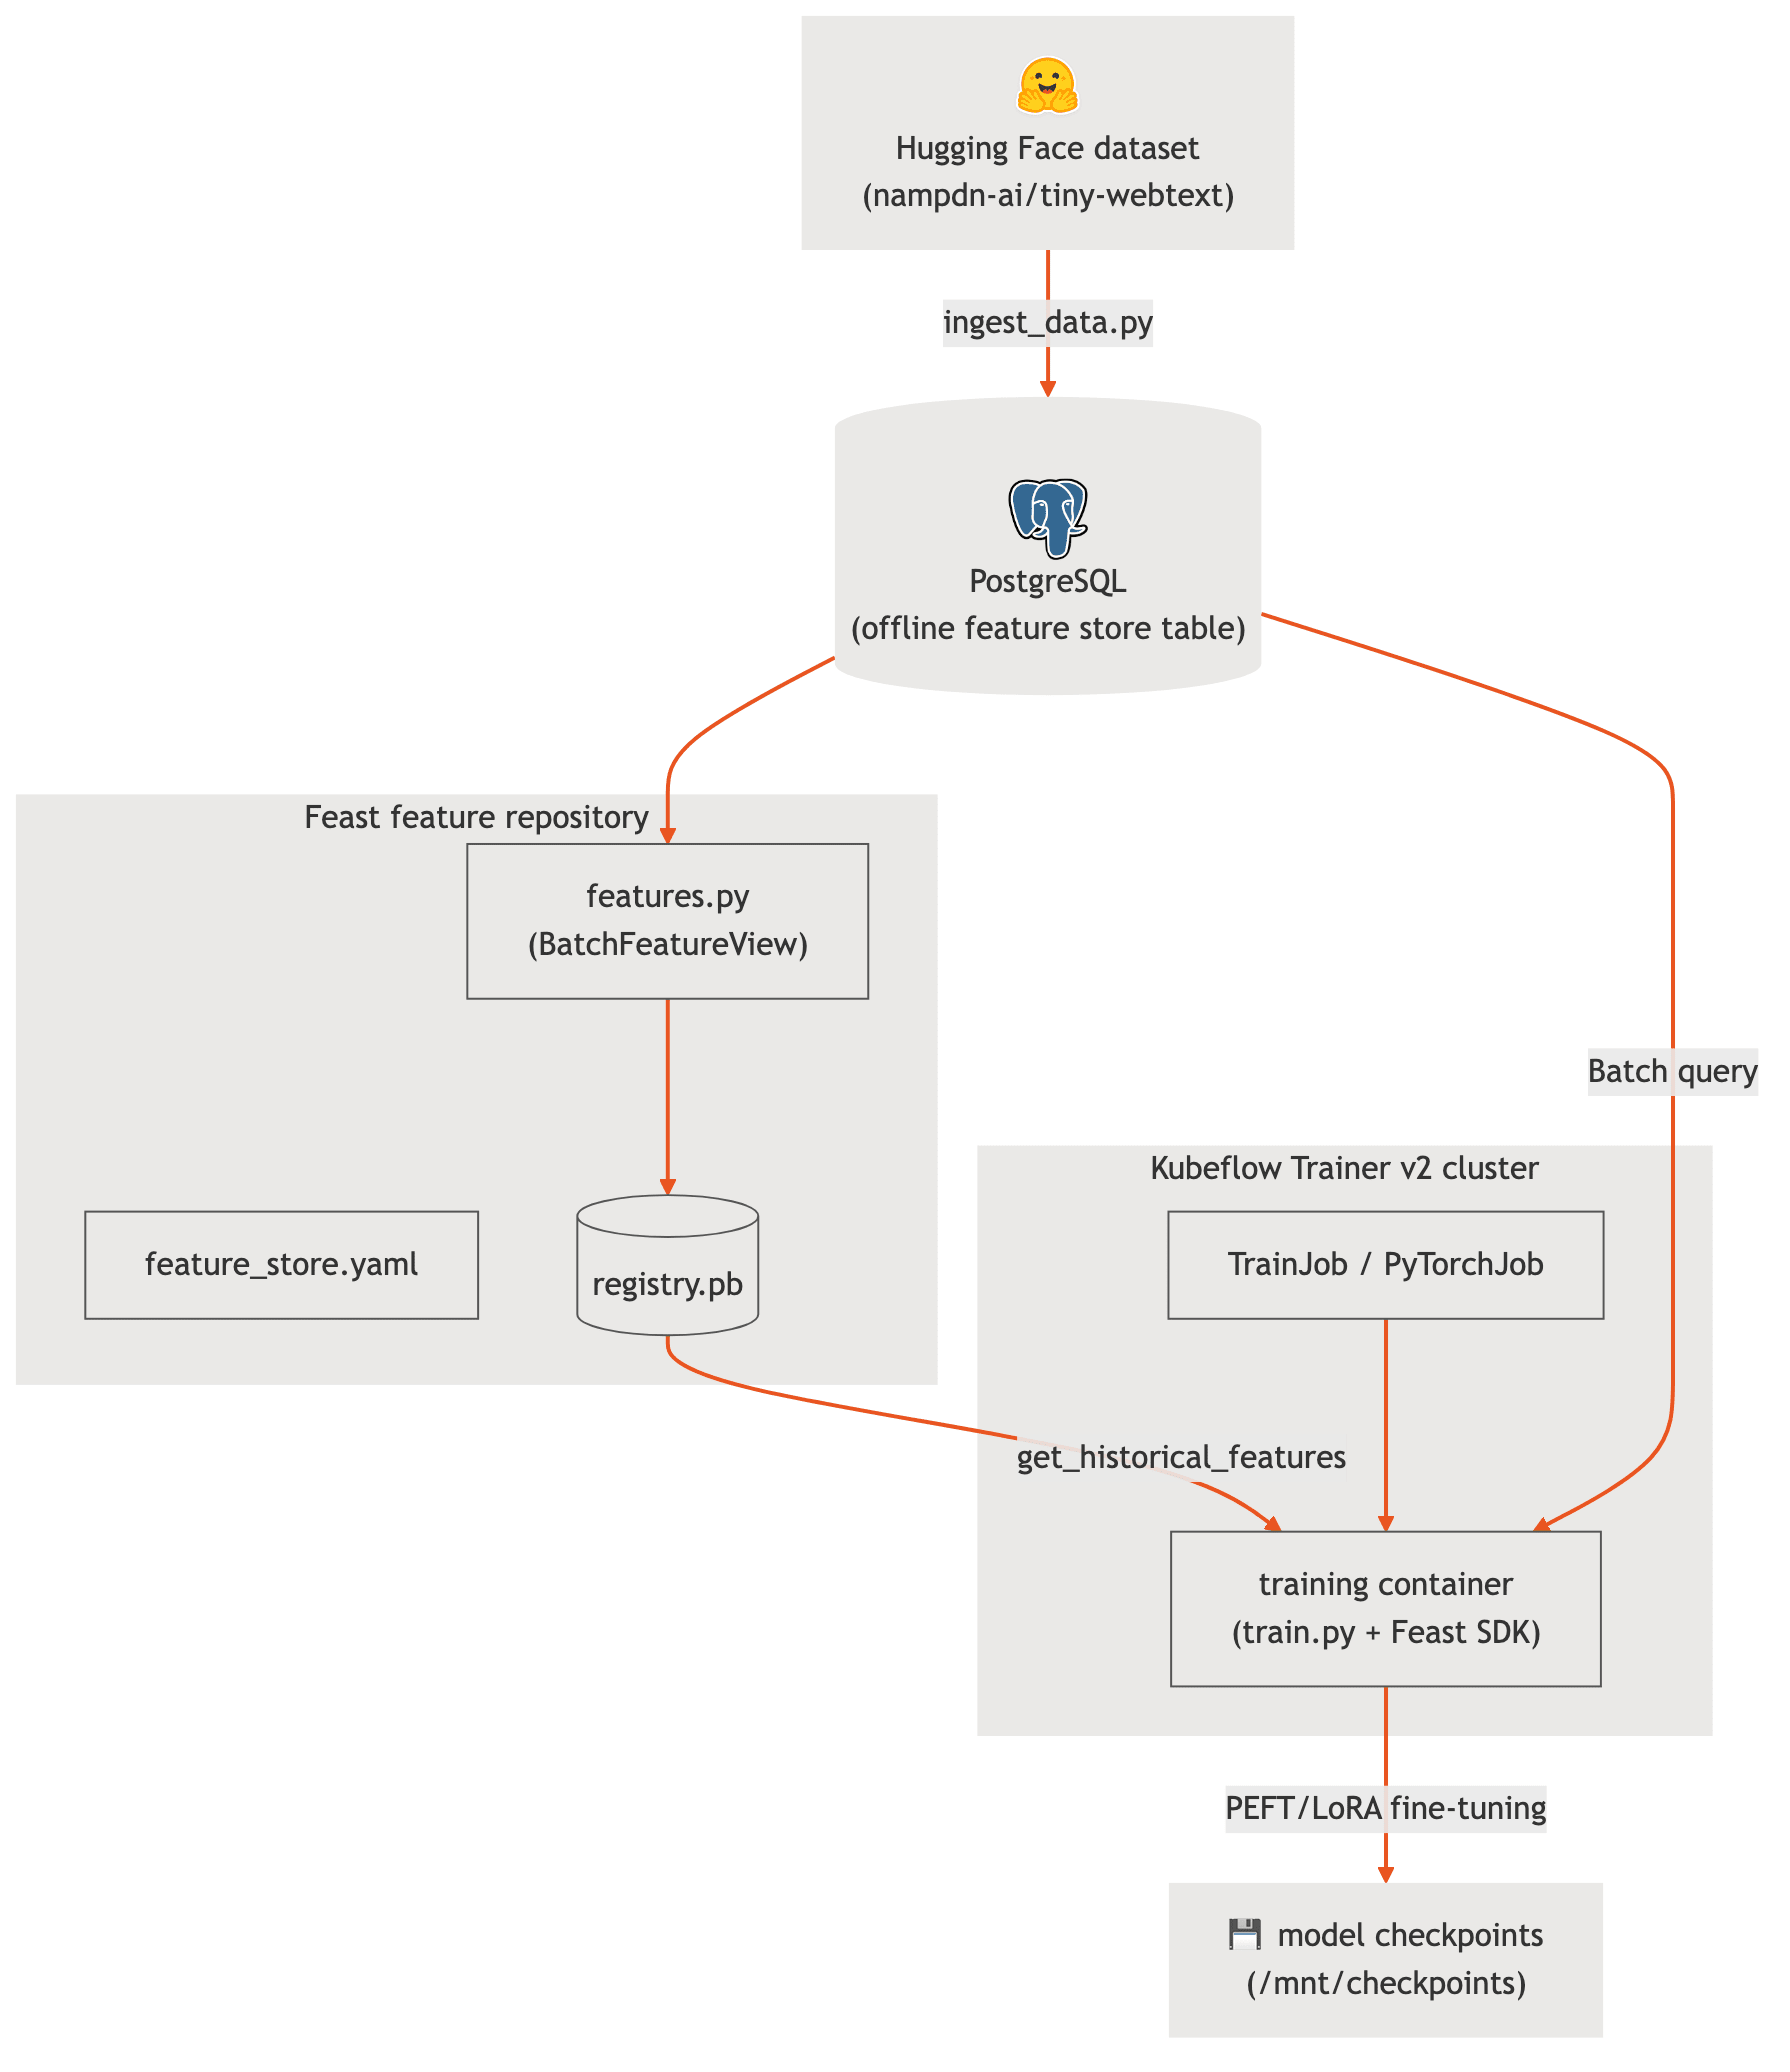
As you can see from the diagram, we’re going to pull a dataset from Hugging Face, load it into a Postgres database, register it as a reusable, offline feature store in Feast, and then run a training job using the Kubeflow Trainer v2. We’re going to persist the model checkpoints to a Kubernetes Persistent Volume, and then later, we’ll run that up on KServe so we can chat to our new, custom LLM.
Project files
The table below lists all the project files. You’ll find them all in the GitHub repo that accompanies this article.
| File | Description |
| features.py | Feast Entity and `BatchFeatureView` schema definitions |
| ingest_data.py | Ingestion script downloading HF dataset into PostgreSQL |
| train.py | Training script consuming Feast features & fine-tuning with HF LoRA |
| train_job_no_registry.py | Kubeflow Trainer v2 `TrainJob` Kubernetes custom resource |
| requirements.txt | Python package dependencies |
| train_distributed.py | Training script consuming Feast features & fine-tuning with HF LoRA – distributed multi-node flavour |
| create_pvc.yaml | Creates a persistent volume to store the model checkpoints, so you don’t lose your work when training completes |
Grab all the files from the GitHub repo by running the following command in your Jupyter Notebook terminal session:
git clone https://github.com/grobbie/fine-tune-your-own-custom-llm-with-canonical-charmed-kubeflow-and-feast.gitIngest the dataset into the feature store
Since we chose to deploy the Feast feature store module when we originally set Charmed Kubeflow up, there’s not really that much to configure. You’ll need the database credentials for the Postgres `offline_store` database, which you’ll find in the file `/feast/feature_store.yaml` on your Jupyter Notebook instance. Got those? Great. In your Jupyter Notebook terminal session, type in the following environment variables, making sure to replace the values “your_user” and “your_password” with the right ones for your Postgres offline feature store.
export POSTGRES_HOST="postgres.default.svc.cluster.local"
export POSTGRES_PORT="5432"
export POSTGRES_DB="offline_store"
export POSTGRES_USER="your_user"
export POSTGRES_PASSWORD="your_password"
There are some dependencies we need that are missing from the standard Jupyter Notebook image. Let’s fix that. Run these commands in your Jupyter Notebook terminal session:
conda install gcc gxx_linux-64
mv fine-tune-your-own-custom-llm-with-canonical-charmed-kubeflow-and-feast kubeflow-feast-finetune
pushd kubeflow-feast-finetune
pip install -r requirements.txt
popd
You’ll need to log into your Hugging Face account now and authorize the session, which you can do by running the following command in your notebook terminal session and following the onscreen instructions.
hf auth loginYou might also need to accept the terms of use for the dataset if you didn’t already. You’ll need to do that at https://huggingface.co/datasets/nampdn-ai/tiny-webtext or you’ll get an error when you try to run the ingestion script.
Ok, now run the following command in your notebook terminal session to download the dataset from Hugging Face and load it into your PostgreSQL database.
python kubeflow-feast-finetune/ingest_data.pyRegister the features with Feast
The script `features.py` will register the features in Feast. We don’t need to run this directly, the `feast` command will pick up the script and run it for us. We just need to copy the Feast YAML configuration file into the directory beforehand. Run the following commands in your notebook terminal session:
pushd kubeflow-feast-finetune
cp /feast/feature_store.yaml .
feast apply
popd
Package the training script
The following commands will create a Kubernetes config map loaded up with all the script and configuration files needed for the training job. Run them in your notebook terminal session, as before:
pushd kubeflow-feast-finetune
python3 -c '
import yaml

cm = {
    "apiVersion": "v1",
    "kind": "ConfigMap",
    "metadata": {"name": "feast-train-code", "namespace": "kubeflow"},
    "data": {
        "feature_store.yaml": open("feature_store.yaml").read(),
        "features.py": open("features.py").read(),
        "train.py": open("train.py").read()
    }
}
print(yaml.dump(cm))
' | kubectl apply -f -
popd
Create the Kubernetes PersistentVolumeClaim (PVC)
Apply the `create_pvc.yaml` manifest to create a 20GB persistent storage volume in your `kubeflow` namespace. You’ll need this later as without it your work will be gone when your training job completes. Run the following command in your notebook terminal session:
cat kubeflow-feast-finetune/create_pvc.yaml | kubectl apply -f -Submit the fine-tuning job to run on your cluster
The next command will launch a `torch-distributed` training job on the cluster, just using one training instance. Go ahead and run the command in your Jupyter Notebook terminal session.
cat kubeflow-feast-finetune/train_job_no_registry.yaml | kubectl apply -f -You should see a confirmation message that the training job has been successfully created.
Monitor training
The training job will take a while to complete – maybe an hour or more, depending on your hardware. You can monitor it using the command below. Again, run it in your Jupyter Notebook terminal session:
kubectl logs -f -l batch.kubernetes.io/job-name=feast-tiny-webtext-finetune -n kubeflow -fThe command above will allow you to follow the progress of your training job. When it’s finished, you’ll see a message in the output something like `Training job completed`. When you see that, you can use Control-C to stop following the log file. The fine-tuned model weights will be saved to your configured persistent volume.
All done. Now to test it out
Model serving with KServe
Let’s deploy a KServe model server on Kubernetes pointing to your PVC path, so we can chat to it over an OpenAI-like REST API, like you would do with ChatGPT. The “storage URI” in the following code listing points to the storage volume (“PVC”) that we created for the training job, so that the KServe model server can use its output to serve our brand-new fine, fine-tuned LLM. Run the following command in your Jupyter notebook terminal session:
echo "apiVersion: serving.kserve.io/v1beta1
kind: InferenceService
metadata:
  name: tiny-webtext-llm
  namespace: kubeflow
spec:
  predictor:
    model:
      modelFormat:
        name: huggingface
      storageUri: "pvc://model-checkpoint-pvc/"
      resources:
        limits:
          cpu: "4"
          memory: "8Gi"
        requests:
          cpu: "2"
          memory: "4Gi"
      args:
        - --model_id=/mnt/models
        - --backend=huggingface
        - --task=text_generation
" | kubectl apply -f -
You’ll need to get the IP of the KServe inference service to be able to chat with your new LLM. To keep things simple, we’ll use the internal IP address, and chat from our Jupyter Notebook terminal session. We can use this one-liner command to find that IP address.
KSERVE_IP=$(kubectl get services -n kubeflow | grep tiny-webtext-llm-predictor | grep private | awk '{ print $3 }')Now that we’ve got the IP address, we can chat with the custom LLM.
curl -i http://${KSERVE_IP}/openai/v1/chat/completions   -H "Content-Type: application/json"   -d '{
    "model": "tiny-webtext-llm",
    "messages": [
      {"role": "user", "content": "What is your favorite color?"}
    ],
    "max_tokens": 80,
    "temperature": 0.2,
    "top_p": 0.9,
    "stop": ["\nHuman:", "<|endoftext|>"]
  }'
You should get some kind of answer:
“I love the color of the car. I love the way it looks. I love the way it looks. I love the way it looks. I love the way it looks. I love the way it looks. I love the way it looks. I love the way it looks. I love the way it looks. I love the way it looks. I love the way it looks. I love the way it looks. I love the way it looks. I love the way it looks.”
Fair enough, that was a bit of an anticlimax. The model that we’ve been using as the base model for our fine-tuning – GPT-2 – is a very early model, publicly released in 2019. To get better answers, you can try training a more sophisticated base model, by playing with the `–model-name` parameter sent to `train.py`. For example, you could try the Qwen2.5-0.5B-Instruct model, which is pretty advanced:
python train.py --model-name=Qwen/Qwen2.5-0.5B-InstructAsking the same “what is your favorite color?” question to this more sophisticated model yields quite different results:
“The most important thing is to find something that you like and that you feel comfortable with. If you like a certain color, then that’s great! If you don’t like a certain color, then that’s okay too. Just remember to choose something that you feel comfortable with and that you like. This will help you to feel more confident and comfortable in your own skin. Remember, it’s okay”
However, just beware – that model might take a lot longer to fine-tune. Using the exact same dataset, it took my system (which has no GPUs) all day when I tried. You can mess with that by tweaking `train_job_no_registry.yaml` – but I’ll stop here for now. You’ve got everything you need to take things further yourself.
- Discover the full capabilities of Charmed Kubeflow
- Deep dive into feature engineering with Feast
- Want us to manage the infrastructure so you can focus on the models? Sign up for Managed Kubeflow on Azure


